
5 Easy Steps to a Having a Great Classical Guitar Setup
 As musicians, our goal is to keep our guitars in top playing order for as long as possible. No one likes a muddy-sounding guitar, or a warped neck, or even a dirty instrument. Your guitar only treats you as well as you treat it.
All guitars need a proper setup. Classical guitars, although built differently than other guitars, are no exception to this rule. In this lesson, we will teach you how to perform a basic classical guitar setup.
Step One – Strings Removal
First things first; strings. In order to perform a full setup, you will need to strip your guitar bare of its strings.
Step Two – Check Neck Relief
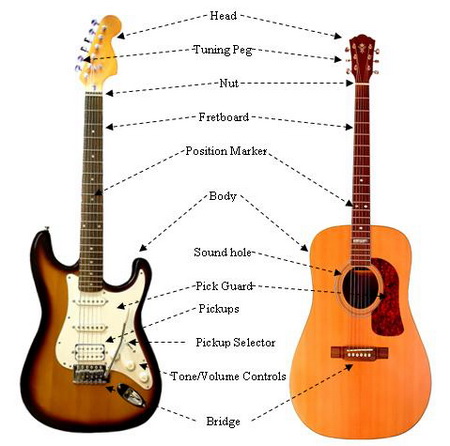
Lay a ruler across the bridge to the neck. This will allow you to see the angle of the neck in relation to the bridge. If the angle is a bit extreme, you will need to make some truss rod adjustments in case your classical guitar actually has one.
Most classical guitars don’t have a truss rod though, and neck adjustment will be as difficult as surgery. If this is the case, neck adjustments for your set classical guitar go beyond the scope of this article.
To adjust your truss rod if your classical guitar has one, you will first need to locate it. It will be at the bottom of the neck towards the sound hole. Tightening the truss rod will add a dip, while loosening will add an arch. Adjust in quarter-turn increments, and recheck with your ruler by laying it back across the bridge to the neck to check in between each and every adjustment.
Step Three – Check Your Fret Wiring
If your fret wiring is protruding from the end, you will need to file it down. Likewise, if your fretting is uneven, you will also need to file it down. Hammering your fret wire back in will only damage your guitar. To check the levelness of your fret wiring, simply lay a straight-edged razor over your frets.
The razor should spam three frets. If it doesn’t, you may want to purchase a larger razor, as it is hard to compare all of your fret wires in pairs. This is because you are only comparing the levelness of the current fret to that of the next. Doing this won’t show you any differences in level changes.
Step Four – Bridge Positioning
Next up is the bridge. The bridge should peak at the fourth string. If it doesn’t, you will need to adjust the positioning. Likewise, you should check the nut. If your nut is off, or the holes have become dull, and have trouble gripping strings, you will need to re-carve the nut slots to allow your strings to sit properly.
Step Five – Restringing
The final step to a basic classical guitar setup is to restring your guitar. Take your time and be sure to wind each string properly. If you have a key, use it. Once your strings are on, tune up and get playing.
If you feel a bit nervous about performing any adjustments on your guitar, don’t second guess your judgment; bring it to a professional. This will avoid any possible heartache from accidental damage.
Learn to Setup Your Own Guitar Anytime, Anywhere

Learn And Master Guitar Setup & Maintenance is a comprehensive step-by-step video course that shows you how to setup your guitar at home using simple tools.
You will be able save time and money by learning to make your own adjustments for maximum playability and better tone.
Related Articles


We Recommend…

Leave A Comment