
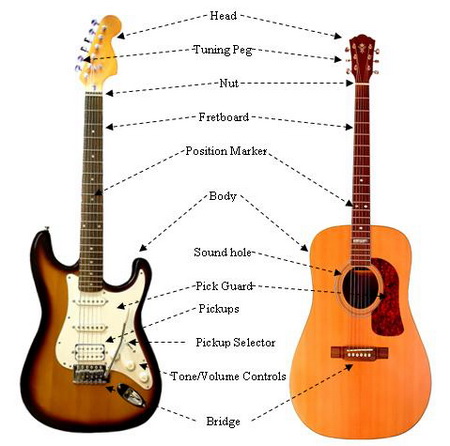
8 Tips to Help You Change Guitar Chords Smoothly Like a Pro
 Wouldn’t it be nice if we could hold our hand in one spot in the guitar and have everything play itself? The sad truth it, it will never happen. This is why we need to learn how to change chords.
At first, chord changes will seem clunky and awkward; that’s a promise. This is due to the fact that you are teaching your fingers how to take one shape and switch and turn and spin it all around into a full new shape. This takes a ton of time to master.
In this lesson, we will discuss the basics that will give you a jumpstart on changing chords and allow you to develop the skill a bit easier.
First Off, Obey The Rules Of Pressure!
The rules of pressure are simple; when changing chords, keep even pressure on your digits. This means that when you change from a G Major chord, which is one of the farther spaced chords for fingering, to a C Major chord, you need to keep even pressure on each finger. The reason for this is so that your fingers can automatically work themselves into the strings.
When you change chords, be sure to keep your fingers close to the strings. This means don’t stretch your hands and crack your knuckles in between chords, as you will find in quite difficult to regain your bearings.
Keep your fingers slightly above the strings and leave only just enough room to move your finger without keeping your notes fretted. This allows you to keep pressure on your fingers while moving them, which will in turn make the new chord shape easier to adjust to.
Be Mindful of Where Your Fingers Land
The first thing you need to do when changing chords is to pay attention to your fingers. This may sound obvious, but many guitarists tend to focus on their picking hands when changing chords. This is due to the fact that the picking placement changes when the chords change. Don’t let this be you; keep your eyes on your fretting hand. While you won’t always need to, when first learning chords it is the best thing that you can do.
Minimize Movements to Maintain Fluidity
When changing chords, keep the pressure on, but don’t turn your hand into a claw. You want to create as little distance as possible between your fingers and the strings. This means that you don’t want to take your hand all of the way off of the fret board. Chord changes should be subtle, not extreme. The movement should be likewise. Keep enough pressure in your fingers to ready them for fretting, but keep your wrist relaxed.
Keep Your Hands Steady.
 I have seen many guitarists hands practically convulse when adjusting to a new chord shape. Relax! Chords are your friends, and you have no need to rush chord changes at first, so take your time and let your fingers find their natural motions.
Don’t allow your hand to tense, just keep that even pressure of your fingers hovering lightly above the strings and when time comes press down.
Don’t White Knuckle Your Chords!
White knuckling is a form of fretting in which you fret so hard that your knuckles actually turn white. Not only is this extremely unhealthy for your digits, but it puts a monumental amount of strain on your wrist.
This can lead to carpal tunnel syndrome, tendonitis, or even worse. When you find the chord shape, ease your finger into it. Treat your chords shapes like you would a pair of shoes; gently work your way into them. Don’t force because you will soon find that chord changes are made much more difficult through excess strength.
Tackle the Difficult Chords First
The best way to start off with chord changes is to begin with the largest chords first. Believe it or not, they are actually a lot easier than smaller chords changes. This is because smaller chord changes involve your fingers being closer together. They require finer movements, which will be harder at first.
Start by moving from a G Major chord shape to an A Major chord shape. Switch between the two chords every bar until you are comfortable. Once you are, try switching between an A Major and an A minor. You may find this chord change more difficult. This is because it is a smaller movement, which means that your fingers have less freedom and less time to find the proper shape.
Practice, Practice And More Practice…
In the end, practicing guitar chord changes comes down to working with chords. As with our examples, try switching between some of your larger chord shapes first. As they begin to feel more natural, allow yourself to move on to smaller chord changes. Make chord changes a part of your daily practice. After you finish running through your scales, take some time to go through chords.
Try playing eight different chords in a row, a bar apiece. This will assure that your fingers aren’t becoming too used to the same shapes and structures. What you put in is what you will get out; this means that the amount of effort you put into learning chord changes dictates how fluent you become. Work hard, and have fun.
The Ultimate Guitar Learning Guide

Related Articles


We Recommend…

Leave A Comment
One Comment
The overwhelming majority of guitarists play instruments designed to be fretted with the left hand and strummed/picked with the right, commonly misnamed “right-handed” guitars. By contrast your site features images either real or reversed (I suspect the latter — e.g., who wears a wedding ring on their right hand?!) of virtually nothing but “left-handed” models. Just wondering what’s up with that. Many/most viewers of your site might find it a bit disorienting.